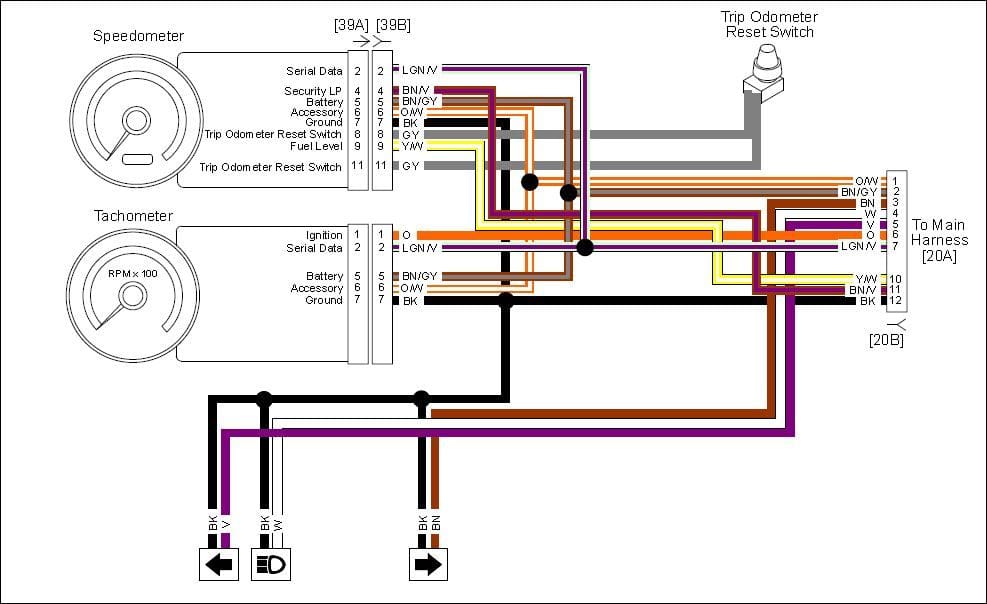
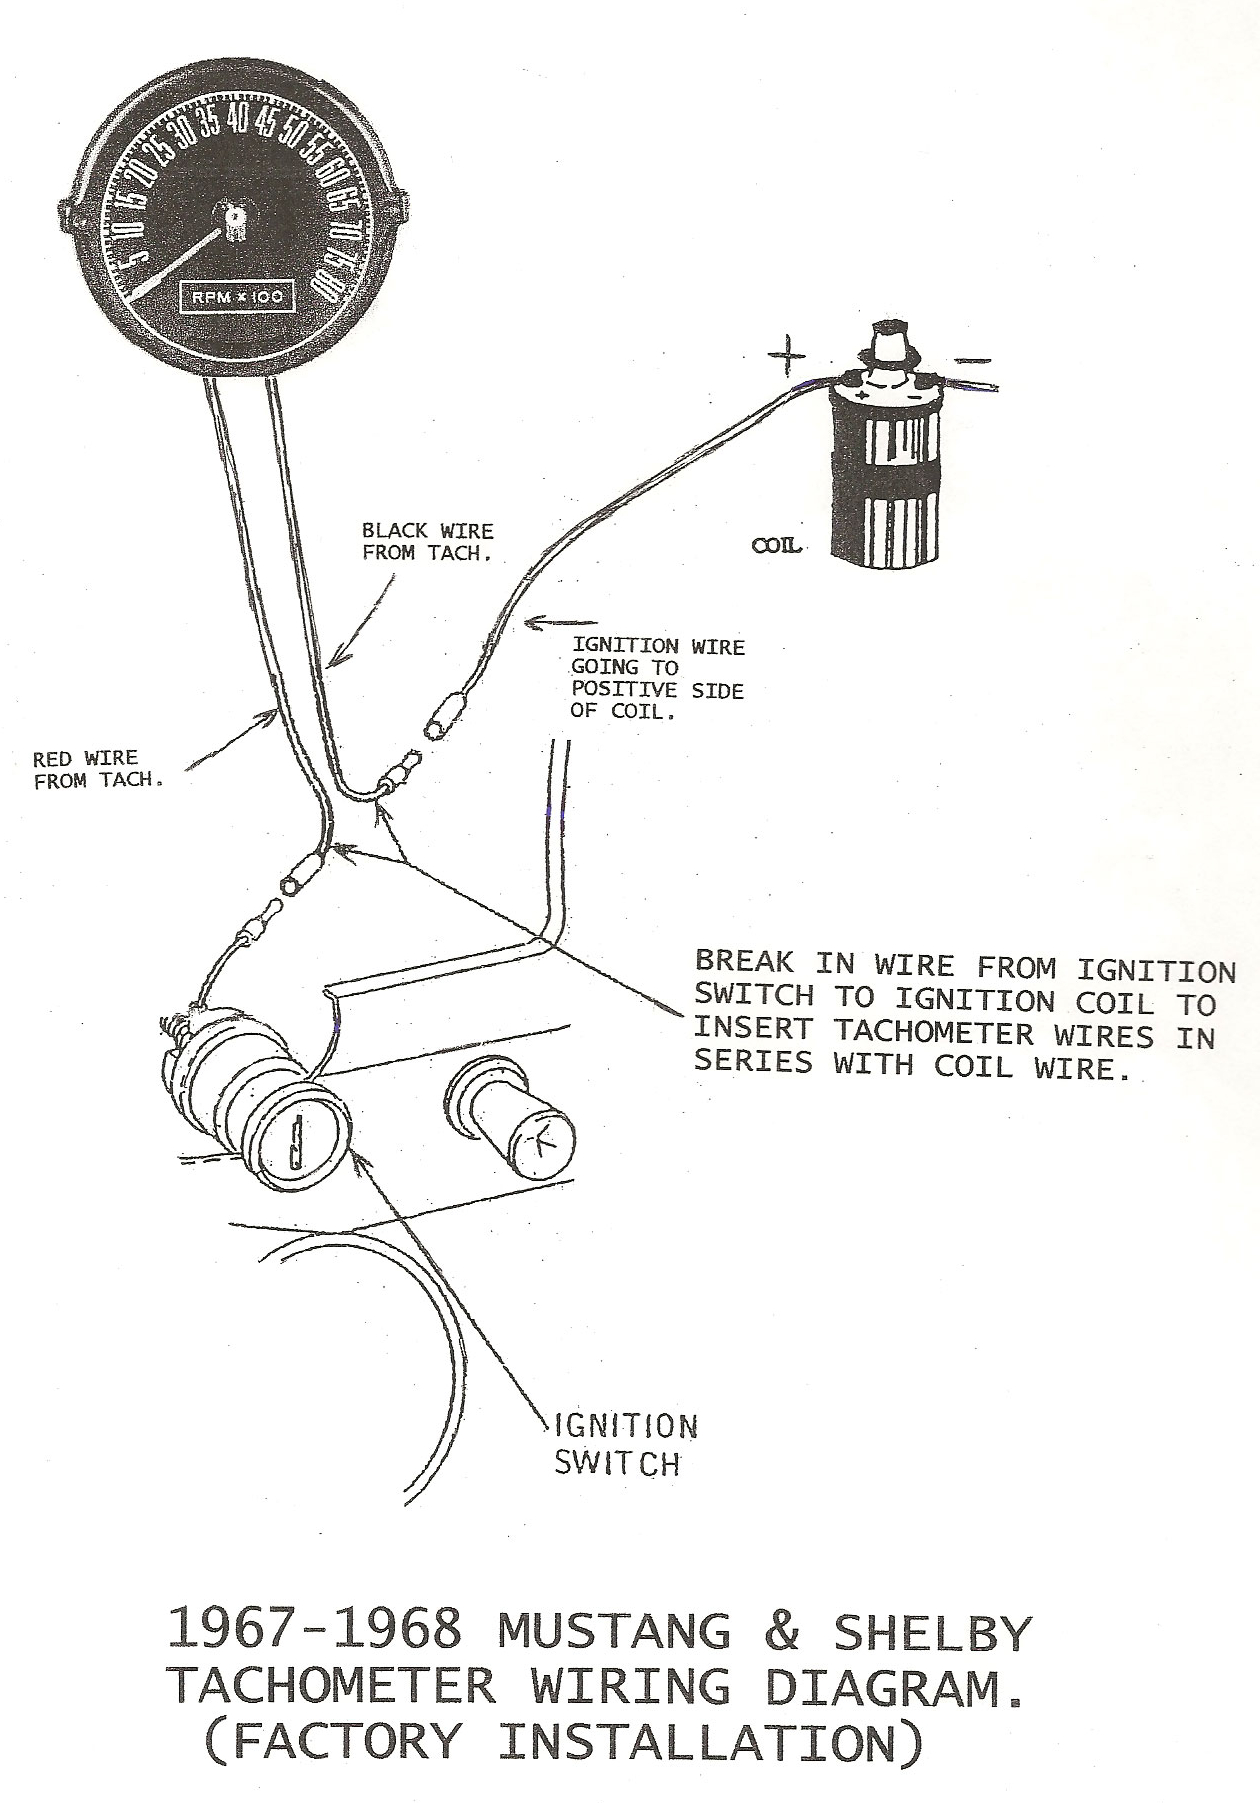
Tachometer Wiring Diagram
Attach this con nector to a terminal on the remaining lamp socket which will be referred to as socket b. Connect a wire from pin #5 to a constant +12 or +24 volt source.
20 Best Equus Tachometer Wiring

Volvo penta tachometer 23715875 was 873992 and 23715874 873998 replaces vp873688 vp873660.
Tachometer wiring diagram. According to earlier, the lines in a tach wiring diagram represents wires. You may also mount the tachometer the installation, wiring, calibration and operation of all. Volvo tach needle pegs with engine running its a ado technic ag 854911 signal comes from alternator should be it.
Vdo gauges wiring diagrams and boat tach diagram e z go golf cart for boat gauge wiring diagram for tachometer image size 1200 x 1362 px and to view image details please click the image. Cut out a notch in this grommet to pass the wires through or drill a new hole for the wires to be sent. On the end of the white insulated wire, which will be used for the tach signal, install a. female spade terminal.
Avoid contact of the tach with windshield or other objects to maintain rubber shock absorbing feature. These guidelines will likely be easy to comprehend and implement. With the tachometer and wiring in place, finishing the job is easy.
At times, the cables will cross. Tachometer installation and operations instructions. (image/auto meter) of course, this cheat sheet only covers the tachometer's needle movement.
Volvo penta 370 general and wiring diagrams electrical materials tad720ve tad721ve. Wiring diagram comes with several easy to adhere to wiring diagram guidelines. Please understand that proper wiring must be maintained throughout your vehicle.
Injunction of two wires is usually indicated by black dot on the intersection of 2 lines. The tachometers in the diagram use a specific auto meter wiring color code, so if you've got a different brand of tachometer you should reference its own schematic. Variety of autometer tach wiring diagram.
Existing holes will have a rubber grommet to protect the wiring. A 12 v motorcycle battery is a good alternative for cars without batteries. The tachometer is preset at the factory for a 6 pulse input for 2 cycle.
It's meant to help all the typical consumer in building a proper method. The wiring diagram shown is a typical installation. Wiring configuration is different than most tachometers.20150213 200330
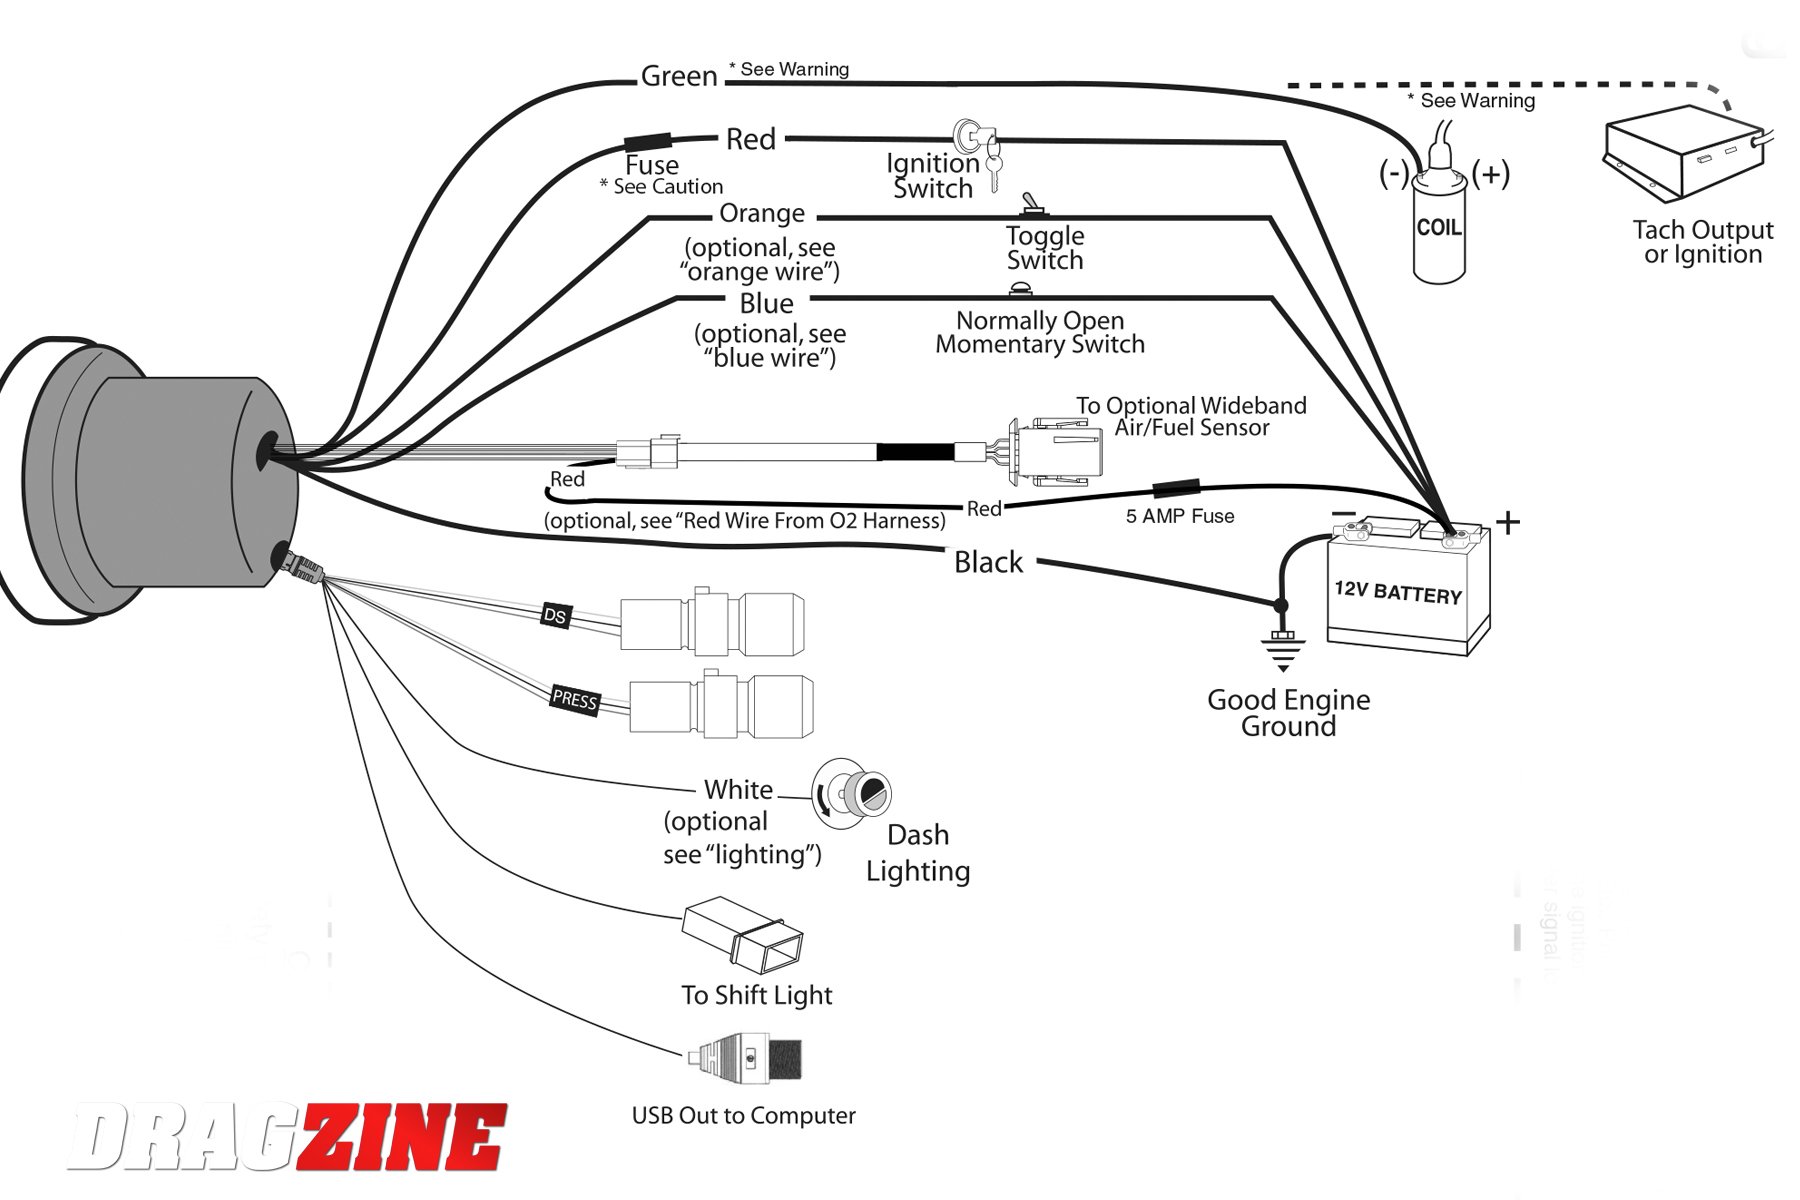
Be sure to wire the tachometer before mounting. A 12 v power source must be used to power this tachometer. 3 tachometer wiring (figure 2):
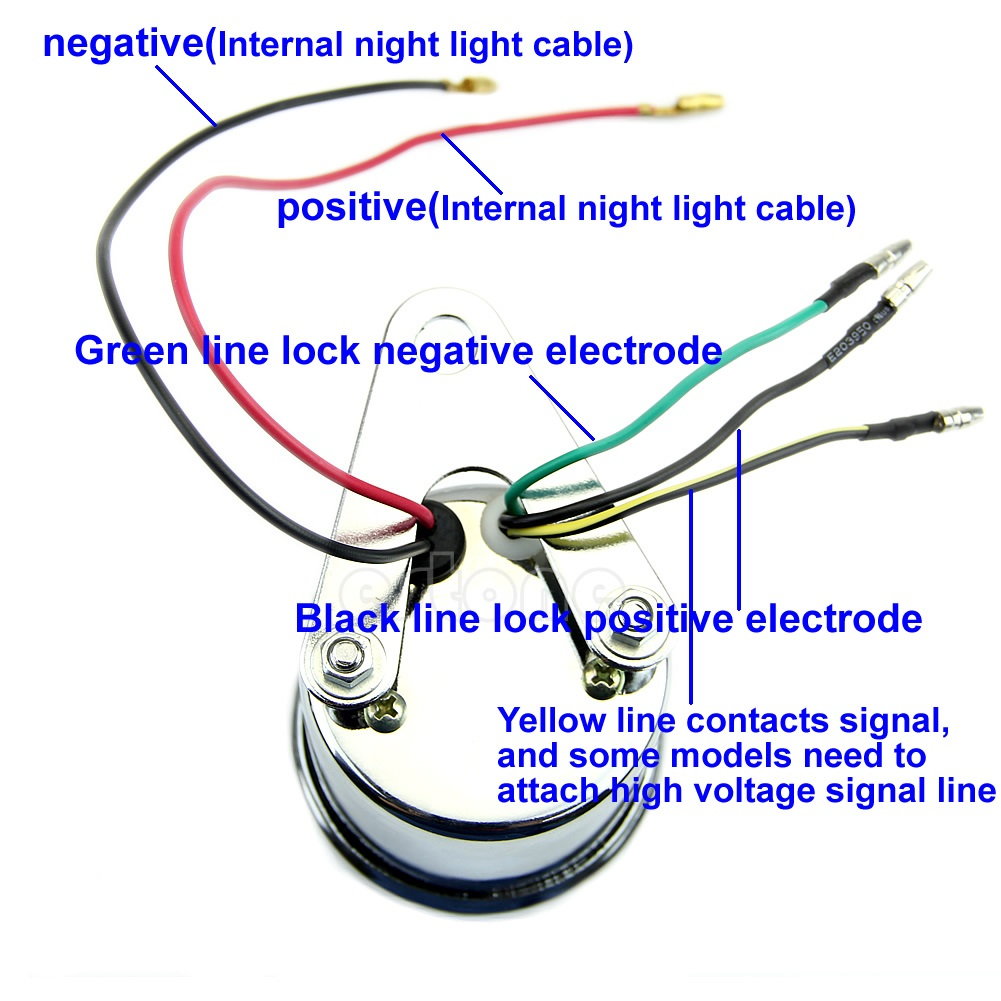
Sunpro is a maker of gauges and tachometers and has been producing these devices since the tachometer grew in popularity in the s. Attach the wire from pin #3 to a ground (negative) source. Vdo tachometer wiring diagram refer to diagram b for dimensions.
Wire the tachometer to the vehicle as shown in diagram h on page 4. It consists of guidelines and diagrams for various types of wiring techniques as well as other items like lights, home windows, etc. But, it doesn't mean connection between the cables.
Wiring connect the tachometer wires as shown. Wire to a junction, and attach the wire from pin #4 at this junction (i.e. Strip ‰ of the insulation from the black, red and white covered wires.
Set the cylinder switches to match the number of cylinders in your engine. Tachometer wiring diagram is one of the images we found on the net from reliable resources. Mount tach base firmly to reduce vibration, wear and tear.
It is intended to assist all of the average person in building a proper system. Sunpro is a maker of gauges and tachometers, and has been producing these devices since the tachometer grew in popularity in the s and s with the rise of sport and muscle cars. Here is a picture gallery about sun super tach 2 wiring diagram complete with the description of the image, please find the image you need.
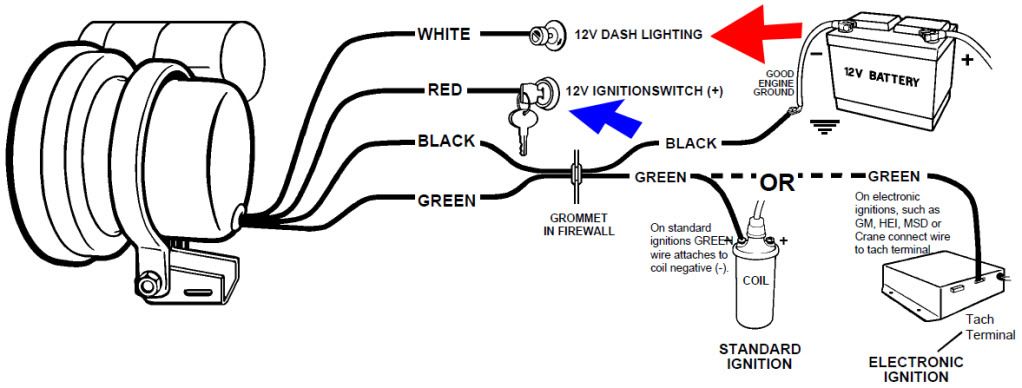
Use an existing hole in the firewall to pass the black and green wires through to the engine bay. To install the light bulbs use needle nose pliers to insert the bulb in the bulb receptacle on back of gauge then twist clockwise ¼ turn to lock into placelost the. When connecting to the negative post of the ignition coil or to the msd 6 box run the shielded cablešincluded with.
161 or equivalent 2 4. One such source can always be found where the battery is attached to the metal frame of the vehicle. There will be principal lines which are represented by l1, l2, l3, and so on.
For chrysler blue, gold and silver boxes, ford standard electronic ignitions, and most other oem standard, cd and electronic ignitions. Combine the black and uninsulated wires, which will be used for the ground, into a 5 16 ring terminal. Wire, connect the (pos) terminal to a switched +12v source, like the ignition wire.
Connecting to the ignition coil or msd 6 1. Wiring diagram arrives with a number of easy to follow wiring diagram instructions. The wiring diagram shown is a typical installation.
161 or equivalent 2 4. 12v battery coil ignition coil tach base can be mounted in either direction for convenient mounting.
Duraspark 2 tachometer wiring Ford Truck Enthusiasts Forums


Wiring Diagram For Aftermarket Tachometer

Wiring Up A 5'' Monster Tacho In Your Car Car Electrical
Autometer Pro Comp Tach Wiring Diagram Collection
Tachometer Wiring Question Harley Davidson Forums
Motorola Tachometer Wiring Diagram Wiring Diagram

Quick question on Tach wiring Harley Davidson Forums

Motorcycle Tachometer Wiring Diagram Database Wiring Diagram Sample
Autometer Tach Wiring Question The Forums

Pin on Car tachometer
28 Autometer Sport Comp Tachometer Wiring Diagram Wire Diagram Source Information
31 Sunpro Super Tach 2 Wiring Diagram Free Wiring Diagram Source


[DIAGRAM] Electronic Ignition Tach Install Install A Tach In A Dis Car Wiring Diagram FULL
Technical Wiring an Old School Tach The H.A.M.B.

Autometer Tach Wiring Diagram Free Wiring Diagram
Suzuki Tachometer Wiring Collection Wiring Diagram Sample

Wiring Diagram For Tachometer
FZJ80 to HZJ80 conversion Tach wiring problem. IH8MUD Forum
Tachometer Wiring
